A button is the widget that asks the user to do something. The class is QPushButton and it takes a label: OK, Cancel, Save, Apply.
You connect the button to your code with the clicked signal, and you can give it a keyboard shortcut so it works without the mouse.
You can also give a button a keyboard shortcut, so it works without the mouse.
You can set a lot on a QPushButton, the text, the colours, an icon and a checkable state. This page covers the ones you will actually use.
QPushButton Overview
QPushButton is the go-to widget in PyQt5 when it comes to creating standard buttons. Let’s discuss how to integrate and manipulate this widget in your Python applications.
To use QPushButton, first import it:
from PyQt5.QtWidgets import QPushButton |
Next, initialize and customize your button within your application’s window constructor:
pybutton = QPushButton('Click me', self) |
Here’s a breakdown of the above code:
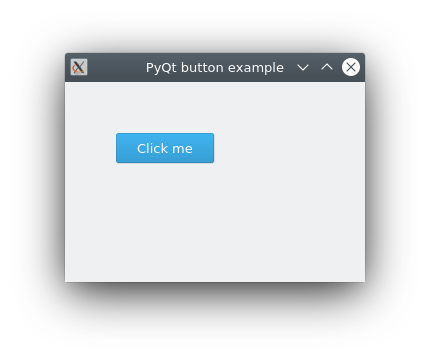
- We create a QPushButton object and assign it the label “Click me”.
- The button is resized to 100 pixels in width and 32 pixels in height.
- Its position is set to (50,50) on the application window.
- The button’s click action is connected to a Python method named
clickMethod.
The button’s appearance varies according to the system’s OS and theme.
Basic PyQt5 Button Example
The full program below has one button that prints a line when you press it.
import sys |
Advanced PyQt Button Features
A QPushButton can display not just text, but also a small icon. Customize these attributes during construction or later with methods like setText() and setIcon().
If a button is disabled, it’ll visually appear “disabled” based on the GUI style.
self.button3.setEnabled(False) |
Activating a button, whether through a mouse click, space bar, or keyboard shortcut, emits a clicked() signal. Connect to this signal to define the button’s functionality. Additionally, buttons offer signals like pressed() and released().
self.button3.clicked.connect(self.Action) |
The program below has a window with several buttons, each doing something different.
- Button 1: A default QPushButton
- Button 2: A button with an attached dropdown menu (QMenu)
- Button 3: This button disables momentarily and then re-enables using QTimer
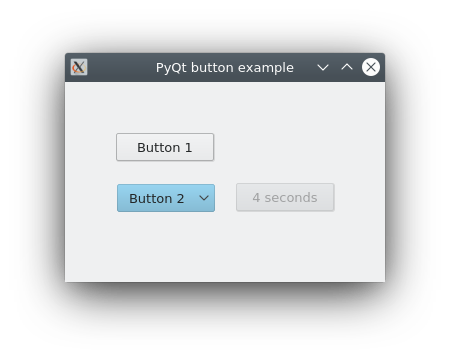
Detailed below is the code that generates the described buttons and functionalities. Notably, it leverages the QTimer class, a handy tool for time-dependent functions.
... |
PyQt’s QTimer is invaluable when you need timers. For instance, it’s used to set intervals for signals or run single-shot timers. Simply construct a QTimer, link its timeout() signal to the relevant slot, and activate it with start().
self.time = QTimer(self) |
Once activated, the timer emits signals at consistent intervals. The setInterval() property denotes the timer’s timeout interval in milliseconds.
Enhance your PyQt skills and build intuitive interfaces with insightful buttons. As seen, the QPushButton widget offers a multitude of customization options, ensuring your application is user-friendly and efficient.
Want more practice on this? Practise this on PyChallenge, there are short browser exercises you can run right after reading.